When I was laid off from my dream job over 8 years ago, I committed myself to the fast track to financial independence. I had a rough go of it for a while, trying one job and then another that turned out to both be very bad fits. I’m lucky—some former coworkers had scooped me up to freelance for them, and that turned into a new dream job. One thing that my two dream jobs have in common? Lots and lots of spreadsheets!
Obviously, I love spreadsheets. Interestingly enough, when I started this blog, I had barely ever used them before. To start getting a hold on my finances, I cobbled together my earliest spreadsheets with no prior spreadsheet knowledge. I had to Google “how to add and subtract in a spreadsheet” for my first one: an expense tracker.
I no longer use that very first expense tracker spreadsheet. But I do still use the next one I made after that, and a few other spreadsheets on my journey to achieve financial independence. Read on to find out how I track my expenses automagically in a spreadsheet now!
Tracking Expenses in Google Sheets with Tiller
For that very first spreadsheet I ever made, I was simply writing down every single penny I spent and using Microsoft Excel to add it all up for the month (my first SUM function!). Now I still track all the money I spend in a spreadsheet, but I don’t key it in manually. Instead I get a daily email of my new transactions automatically sent to me each morning.
The secret is Tiller Money. Tiller links securely to my accounts to download balances and transaction data for me, and drops it right into a Google Sheets spreadsheet. Before Tiller, I used other services that tracked my transactions (like Mint and Personal Capital) but none of them put the information straight into a spreadsheet for me like Tiller does. I was spending hours a month moving information from Mint into my net worth spreadsheet (more on that below). Tiller immediately started saving me time every month.
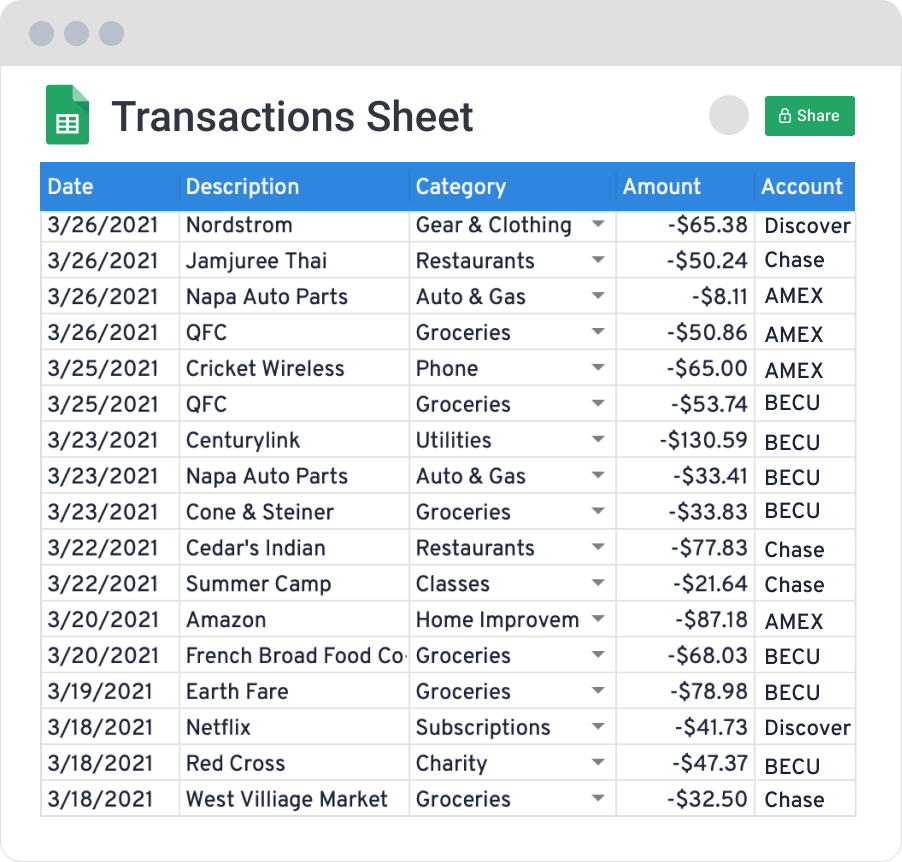
Getting the transaction information into a spreadsheet rather than trapped inside a proprietary website gives me unlimited possibilities for what I can do with the data, without having to download a thing. And, it ensures that my data is always mine to access. A few years ago someone asked how much I spent on restaurants per year. I thought, “Hey, I started using Mint back in 2009! I can just look up years of spending!” But nope, I couldn’t – Mint had deleted my earliest transaction data and didn’t even keep the category level information. So I have no idea how much I spent at restaurants in my 20s – that information is just gone now. But Tiller downloads directly into spreadsheets that I control.
Now with this expense data, I can run any analysis I want on what my family is spending. Which is really helpful in terms of understanding what our expenses will be like when we hit financial independence and eventually retire. It also helps in the here and now, to know how much I have available to save, and to keep an eye on all of my accounts for any strange activity (again, that daily email of transactions comes in handy!).
Savings Snowball
A lot of people credit “pay yourself first” as the tactic to fast track them to financial independence. I think that’s great, if you have a really steady income and you can predict ahead of time how much you’ll have to save, and can put it aside before other bills. But me? I’ve had a variable income for most of my adult life. But I figured out a way to make “pay yourself first” work even if I don’t have steady, predictable income:
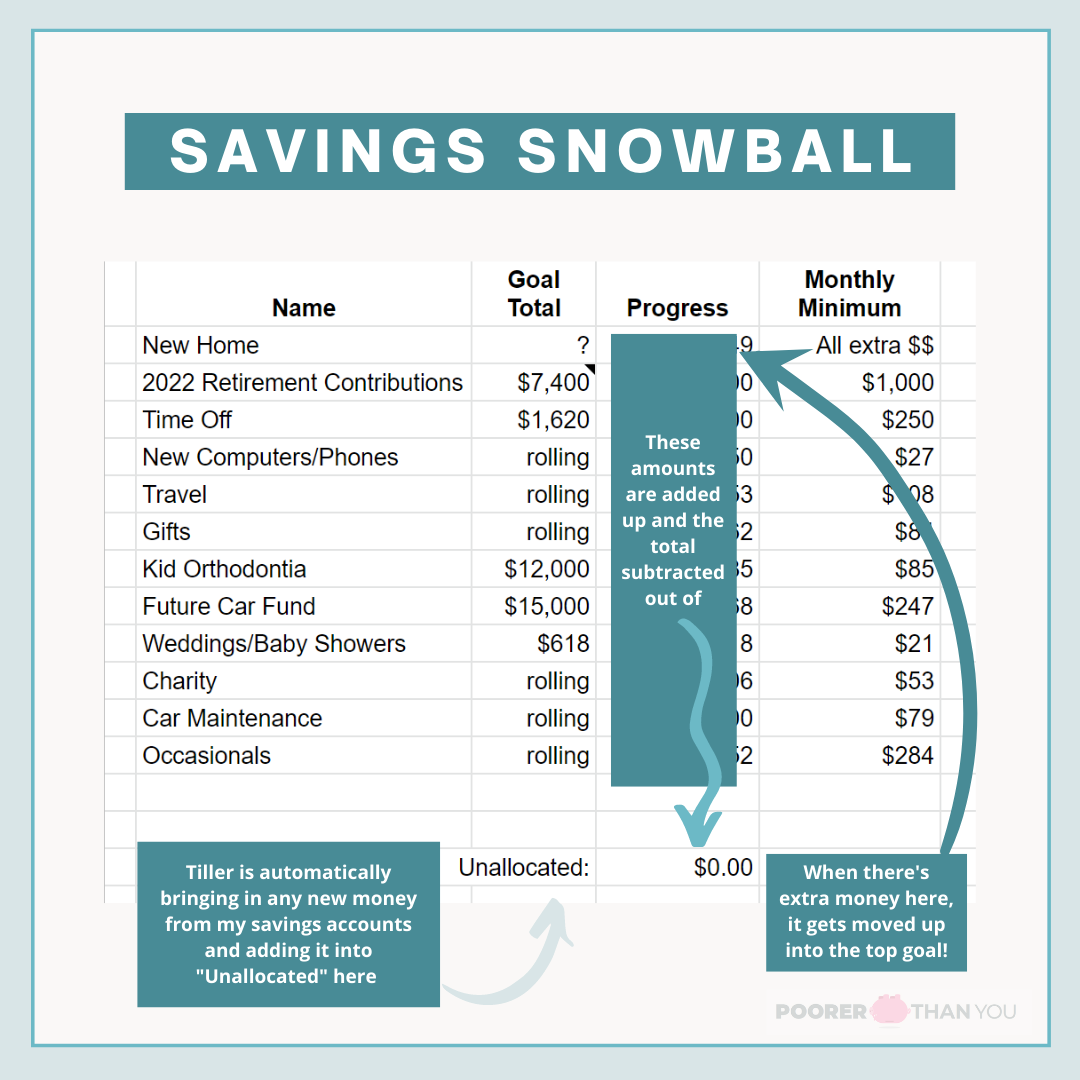
I pay myself first and last. With a “Savings Snowball.”
If you’re familiar with the concept of a “debt snowball” or a “debt avalanche,” my savings snowball works in a similar way, except everything on this list is a savings goal rather than a debt. For each savings goal on my list, I set a “minimum payment” that I contribute each month. In my earlier, broke-r days, this minimum contribution was sometimes as low as $5/month (my retirement savings started out as that!). With these minimum contributions to each goal every month, I’m paying myself first.
But just saving the minimum? Not likely to get me to financial independence (or any of my other goals) any faster. So I also pay myself last by throwing all the extra money I have leftover at the end of the month at the top goal on the snowball list. Once I hit that goal amount, I “snowball” its minimum contribution and all of the extra leftover money each month into the goal that was #2 on the list.
Also included at the bottom of my snowball are various funds that don’t need the whole kit and caboodle thrown at them (thus their place at the bottom of the snowball, while goals that could use “all I’ve got” thrown at them will always be slotted in above). These include any “Occasionals”: fixed expenses that come up regularly but not monthly (such as my car insurance, which I pay every six months), and any sinking funds for expected future expenses of variable amounts (such as a fund for car maintenance). Why include these in the snowball? Laziness/efficiency. I just put money into everything all at once, it’s easier (and faster) that way.
To keep track of all this, I have two spreadsheet tabs – one for my overall “budget” that includes the minimum payment amounts for the snowball. Each year, I increase the minimum contributions in this sheet by a few percent to account for inflation. For “Occasionals” I increase the contribution as the expenses increase (like when I get a notice of my new premium rates for my car insurance).
Inside my main Tiller spreadsheet is my tab for my Savings Snowball. It tabulates up all of my total snowball savings and how much of it I’ve allocated to the different goals in the Snowball already. Each month, I go through and add in the minimum contribution for each goal. And then when Tiller says I’ve got some extra sitting in savings that hasn’t been allocated to a goal yet, I add it on to the #1 goal at the top of the Snowball, paying myself first and last.
Coast to Financial Independence Spreadsheet (Coast FI)
With the expense totals that I got from my Tiller transactions, I can do some fun “actual” financial independence spreadsheets. I say “actual” because any spreadsheet that helps me improve my net worth is technically one of my financial independence spreadsheets, but hey, only some of them have “FI” in the name!
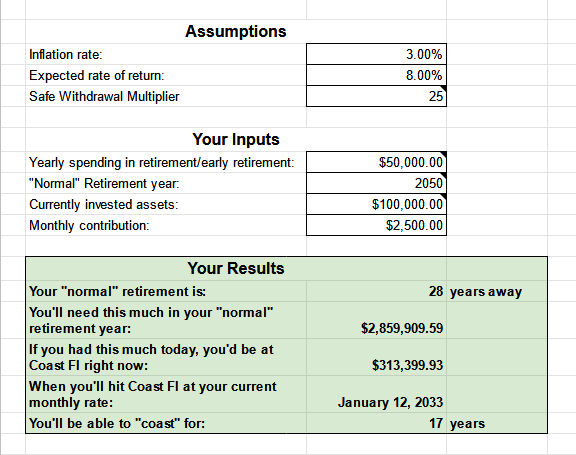
Coast FI is one of those “actual” financial independence spreadsheets – it’s the way I calculate how close I am to fully funding financial independence early. What does it mean to fully fund it early? It means, when I have the amount invested that’s projected to grow to be enough to retire on when I’m 65, then I’m at “Coast FI” – I could just let those investments “coast” until age 65 and they would be enough.
Right now, my spreadsheet says that I’ve got a little ways to go before I hit Coast FI. But I used my transaction data to break down my expenses into categories, and I’m actually at “Coast FI minus housing costs.” Which means, right now all the other aspects of my family’s retirement are saved for – I just gotta keep adding for housing costs (or figure out how to bring future housing costs down, like paying off a mortgage). This is fun to know as a milestone on the way to Coast FI, but can also inform my decisions on how I’m getting to FI, such as whether to buy a house—something I’m currently evaluating.
I have a version of my Coast FI spreadsheet publicly available for you in Google Sheets – you can use your current expenses or do what I’ve done and calculate out what you think your expenses will be once you hit FI. For example, my FI expenses include increased health insurance and health care costs, but leave out life insurance premiums, as our term life insurance policies are set to expire around the time we hit FI.
Net Worth
My net worth number is not my FI number. Our net worth includes some assets that are for the near term (like savings for travel, and our cars), and some debts that will be paid off before before we get to FI. But it’s been so helpful along my journey to track my net worth—from my humblest beginnings to reaching $100,000 in savings to where I am now. My net worth is one constant number that I check each month to see where I’m at.
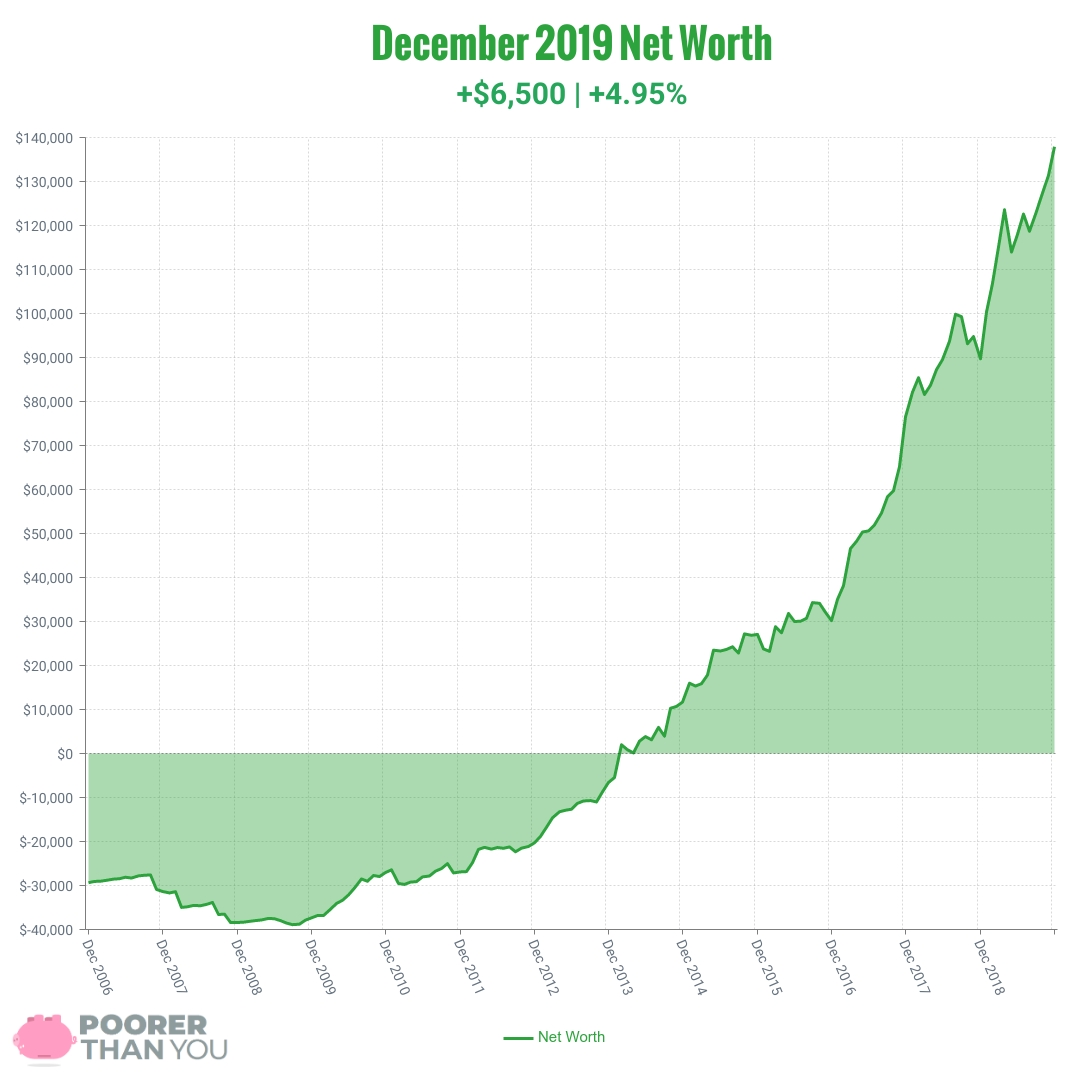
My Tiller spreadsheet automatically calculates our overall net worth for me, in a tab called “Balances” that comes with the Tiller spreadsheet by default.
Because I’m extra, I also separate out my personal net worth from my husband’s and the kids’ college funds. For my personal net worth, I uploaded the spreadsheet that I’ve been using for 15 years as another tab in the Tiller spreadsheet. Then I plugged all of my account balances from Tiller into the formulas, and voilà: Tiller automatically calculates my personal net worth as well. Again, this saves me hours per month versus when I used to copy and paste the balances from Mint.
Four Financial Independence Spreadsheets in Two!
These are all the spreadsheets I currently use for my journey to financial independence. Keen observers will note that several of the “spreadsheets” I mentioned above are actually just tabs in my Tiller spreadsheet!
Most of the time, I’m just working within my Tiller spreadsheet. Then I have my Coast FI one when I want to check in with where we are with regards to coasting. I’m a busy woman and there’s no need for me to overwhelm myself with too many spreadsheets—no matter how much I love them!
You can absolutely make and use free spreadsheets to get yourself to financial independence! But if you can afford it and want to save hours of time, Tiller really does make it a lot easier to get all of your information in one place. And Tiller is offering a 30-day free trial so you can see how much time and effort it will really save you before you commit.
